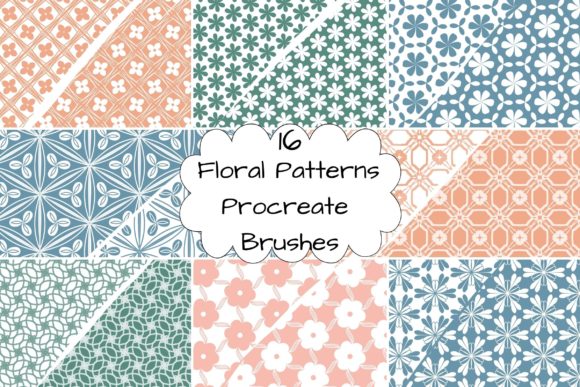
Streamline Your Digital Art Workflow with 16 Floral Patterns Procreate Brushes
Integrating high-quality assets into a creative workflow is often the difference between a project that feels rushed and one that exudes professionalism. For digital artists, designers, and content creators using the iPad, the 16 Floral Patterns Procreate Brushes set offers a specialized solution for adding organic texture and intricate detail without the time investment of hand-painting every petal or leaf. This collection is not merely a set of stamps; it is a functional tool designed to fit seamlessly into broader design processes, from initial concept sketching to final asset delivery.
Understanding where these brushes fit requires looking at the modern creative pipeline. Whether you are a freelancer designing custom wedding invitations, a marketer creating social media graphics, or an educator developing visual aids, efficiency and consistency are paramount. These brushes serve as a bridge between raw creativity and polished execution, allowing users to maintain a high standard of quality while managing tight deadlines.
Technical Compatibility and Installation Process
Before diving into creative applications, it is essential to address the technical foundation required to utilize these assets effectively. The 16 Floral Patterns Procreate Brushes are engineered specifically for the Apple ecosystem. They are compatible exclusively with the Procreate app, which runs on iPad, iPad Pro, iPad Mini, and iPad Air devices. Attempting to use these files on Android tablets or desktop software will not yield results, so ensuring your hardware aligns with these requirements is the first step in your implementation plan.
The delivery method is designed for immediate usability. Upon acquisition, you will receive a single Zip file containing all 16 brush files. The installation process is straightforward but requires attention to the file management system on your iPad. Once the Zip file is downloaded, it typically resides in your "Files" app under the "Downloads" folder. Users must tap the file to unzip it. After extraction, the individual brush files become accessible directly within the Files interface.
To import them, simply tap each unzipped file. Procreate will launch automatically (if not already open) and import the brush into your library. A key organizational detail to note is that these new assets will appear at the very top of your Brush Library. This default placement is advantageous for immediate access during a active session but may require reorganization for long-term workflow efficiency. Many professionals prefer creating a dedicated group within the library labeled "Floral Assets" or "Pattern Tools" to keep their workspace clutter-free as their collection grows.
Strategic Integration into Creative Workflows
The true value of the 16 Floral Patterns Procreate Brushes lies in how they interact with other stages of a project. They are versatile enough to be used before, during, and after the core creation phase, adapting to various methodologies.
Pre-Production and Conceptualization
In the planning phase, these brushes can serve as rapid prototyping tools. When brainstorming concepts for a branding package or a book cover, speed is essential. Instead of sketching complex floral motifs from scratch to gauge composition, creators can use these brushes to block out shapes and test density. This allows for quick iteration on layout decisions. For instance, a surface pattern designer might use the brushes to create multiple mood boards in minutes, determining which floral density works best against specific background colors before committing to a final illustration.
Execution and Production
During the active creation phase, these brushes function as both detailing tools and textural overlays. Because they are pattern-based, they offer consistency that freehand drawing sometimes lacks. This is particularly useful for projects requiring repetition, such as textile designs, wrapping paper, or seamless backgrounds. By adjusting the opacity, size, and streamlining settings within Procreate, users can blend these patterns into hand-drawn elements, creating a hybrid look that feels organic yet polished. This interaction between automated patterns and manual strokes helps maintain the "human touch" while leveraging digital efficiency.
Post-Production and Refinement
After the main illustration is complete, these brushes play a crucial role in refinement and quality control. They can be used to add subtle textures to flat areas, breaking up solid blocks of color that might look too digital or sterile. In a marketing context, adding a faint floral overlay to a promotional graphic can elevate the perceived value of the content. Furthermore, because the brushes are vector-like in their clarity (depending on the grain settings), they scale well, ensuring that the final export looks crisp whether it is destined for a web banner or a large-format print.
Optimizing Usability and Organization
To maximize the lifespan and utility of the 16 Floral Patterns Procreate Brushes, organization is key. As mentioned, the default import location places them at the top of the library. While convenient for the first use, a sustainable workflow demands a structured environment. Professionals should consider moving these brushes into a custom folder immediately after installation. This practice prevents the "clutter effect," where finding specific tools becomes difficult as more assets are acquired over time.
Additionally, understanding the interaction between these brushes and Procreate's layer system is vital for non-destructive editing. It is highly recommended to use these brushes on separate layers rather than merging them immediately with the base artwork. This approach allows for easy adjustments to opacity, blending modes (such as Multiply, Overlay, or Soft Light), and color changes via the Alpha Lock feature. If a client requests a color shift in a floral border, having the pattern on an isolated layer saves hours of rework.
Practical Implementation Tips for Various Industries
Different sectors can leverage these tools in unique ways to enhance their output:
- Freelance Illustrators: Use the brushes to create consistent signature elements across a portfolio. If you specialize in botanical art, these patterns can serve as background fills that unify a series of illustrations, making your brand instantly recognizable.
- Small Business Owners: For those managing their own product photography or packaging design, these brushes offer a cost-effective way to add custom flair. Instead of purchasing expensive stock photos with floral elements, you can generate unique textures that match your specific brand palette.
- Educators and Bloggers: Visual engagement is critical in educational materials. These floral patterns can be used to create decorative headers, bullet points, or framing elements for worksheets and blog posts, making dry information more inviting without distracting from the core message.
- Marketers: In social media campaigns, consistency drives recognition. Using a specific subset of these 16 brushes across a month's worth of content creates a cohesive visual theme. This helps in building a distinct aesthetic for seasonal campaigns, such as spring sales or wedding promotions.
Ensuring Quality and Consistency
When integrating external assets like the 16 Floral Patterns Procreate Brushes into a professional workflow, quality control is non-negotiable. Before delivering final files to a client or publishing content, always review the brush strokes at 100% zoom. Check for any unintended repetition that might make the pattern look tiled or artificial. Adjusting the jitter or spacing settings within the brush studio can help randomize the placement slightly, enhancing the natural feel.
Furthermore, consider the output medium. If the final product is intended for print, ensure your canvas resolution in Procreate is set high enough (typically 300 DPI) to accommodate the detail within the floral patterns. Low-resolution canvases can cause these intricate brushes to appear pixelated upon export, undermining the professional quality of the work.
Long-Term Value and Adaptability
The longevity of this toolset depends on how well it adapts to evolving project needs. Unlike static images, brushes are dynamic; they respond to pressure, tilt, and speed. This interactivity means the 16 Floral Patterns Procreate Brushes can evolve with your style. You are not limited to the default look; by tweaking the grain, shape dynamics, and color dynamics, you can derive dozens of variations from the original 16 files. This adaptability ensures that the asset remains relevant even as design trends shift from hyper-realistic botanicals to stylized, abstract florals.
In conclusion, the successful adoption of these brushes hinges on viewing them as part of a larger operational strategy rather than isolated shortcuts. By managing the installation correctly, organizing the library for efficiency, and applying the tools strategically across pre-production, execution, and refinement phases, creators can significantly enhance their productivity. The result is a workflow that balances artistic expression with the practical demands of deadlines and client expectations, ultimately leading to higher quality outcomes and a more sustainable creative practice.