Mastering Digital Texture: Integrating On Point Procreate Brushes into Your Creative Workflow
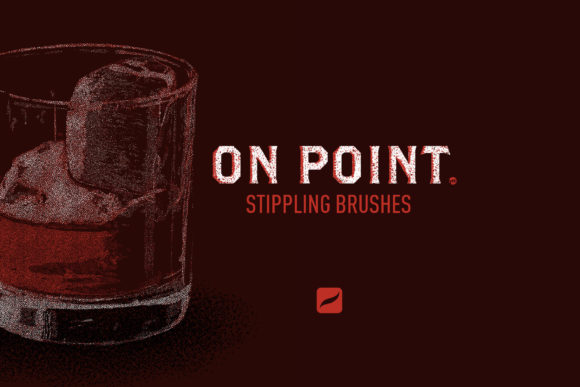
The transition from traditional media to digital illustration often involves a compromise, particularly when it comes to texture. Many artists find that while digital tools offer unparalleled undo capabilities and layer management, they frequently lack the organic grit and tactile feel of ink on paper. This is where On Point Procreate Brushes redefine the process, specifically by digitizing the labor-intensive technique of analog stippling. By bridging the gap between hand-drawn precision and digital efficiency, this brush set allows creators to maintain the aesthetic quality of pointillism without the prohibitive time cost traditionally associated with it.
For professionals ranging from graphic designers to hobbyist illustrators, integrating these tools is not merely about acquiring new assets; it is about optimizing a workflow. The core value proposition lies in the ability to execute complex shading and texturing tasks rapidly. In a standard analog workflow, stippling requires placing thousands of individual dots by hand to create gradients and depth. With On Point Procreate Brushes, this process is accelerated through 50 specialized brushes engineered with varying dot sizes and intensities. This allows you to focus on the artistic decision-making rather than the mechanical repetition of mark-making.
Structuring Your Asset Library for Efficiency
Before diving into creation, effective implementation begins with organization. A common bottleneck in digital art is the time spent searching for the right tool mid-flow. The On Point Procreate Brushes set is structured to mitigate this by categorizing tools logically within the brush library. Each dot size group includes specific liners, detailing brushes, and scatter brushes. Understanding this hierarchy is crucial for planning your session.
When setting up your workspace on an iPad Pro or compatible iPad (2017 or higher), consider creating a dedicated "Texture" folder in your Procreate interface. Import the included BRUSHSET file directly into this folder. This preparation step ensures that when you move from line art to shading, your required tools are immediately accessible. The inclusion of liners alongside scatter brushes means you can switch between defining hard edges and softening shadows without leaving your current tool group, maintaining momentum during the execution phase.
Integrating Stippling into the Design Process
The utility of these brushes extends across various stages of a project, whether you are illustrating a children's book, designing marketing assets, or creating concept art. Unlike generic texture overlays that sit passively on top of an image, On Point Procreate Brushes are designed to be active components of your rendering process.
During the Sketching Phase: Use the scatter brushes to block in tonal values quickly. Instead of committing to solid fills, you can establish light and shadow zones using varied dot densities. This approach keeps the early stages of your project flexible, allowing for easy adjustments before detailed rendering begins.
During the Rendering Phase: This is where the 50 distinct brushes shine. By selecting a brush from a smaller dot-size group, you can add fine details to high-contrast areas. Conversely, larger dot groups are ideal for mid-tones and background textures. The variation in intensity allows for a natural gradient effect, mimicking the way ink accumulates on paper. This level of control is essential for quality control, ensuring that your final output does not look uniformly digital but retains the nuanced imperfections of analog media.
Post-Processing and Layering: The set includes three specific pointillism pattern brushes available in four different sizes. These are particularly useful in the final stages of a project. You can create a new layer above your base illustration and use these pattern brushes to unify the color palette or add a cohesive grain across the entire piece. Because they are scalable and adjustable via opacity, you can tailor the texture intensity to suit the specific requirements of your client or publication without altering the underlying artwork.
Compatibility and Technical Considerations
Successful integration also depends on understanding the technical environment. On Point Procreate Brushes are optimized for the Apple Pencil and require iPadOS version 13.2 or higher. For users operating on older hardware or software versions, performance may vary, potentially affecting pressure sensitivity and tilt recognition which are vital for dynamic stippling.
It is important to note that these brushes rely on the processing power of the iPad to render complex dot patterns in real-time. On an iPad Pro, the latency is negligible, allowing for a fluid drawing experience that feels responsive. However, if you are working on an older model within the supported range (iPad 2017 or higher), you may need to adjust your canvas resolution. Working at extremely high DPIs with heavy texture brushes can sometimes strain system resources. A practical tip for maintaining efficiency is to finalize your canvas dimensions before beginning the texturing phase to avoid resizing later, which can distort the carefully placed dot patterns.
Workflow Synergy with Other Tools
No tool exists in a vacuum. The true power of On Point Procreate Brushes emerges when they interact with other elements of your digital ecosystem. For instance, combine these stippling brushes with custom color palettes to achieve specific moods. The semi-transparent nature of many brushes in this set allows for color mixing directly on the canvas, similar to traditional watercolor or ink wash techniques.
Furthermore, these brushes complement vector workflows. Many designers create clean line art in Adobe Illustrator or Affinity Designer, import it into Procreate for texturing, and then export the final composite. The organic texture provided by the stippling brushes adds a human element to otherwise rigid vector lines, making the final product more engaging for audiences accustomed to sterile digital graphics. This hybrid approach is particularly effective for marketers and content creators looking to differentiate their visual brand identity.
Long-Term Usage and Skill Development
Adopting On Point Procreate Brushes is also an investment in skill development. While the brushes automate the placement of dots, the artist still dictates the flow, density, and direction. Over time, regular use enhances your understanding of light, shadow, and form. You begin to intuitively know which brush size corresponds to which distance from the viewer, improving your overall spatial reasoning in illustration.
To maximize long-term value, experiment with blending modes. Try setting your stippling layers to "Multiply" for deeper shadows or "Overlay" for subtle surface textures. Document your successful combinations in a separate "swatch" file. This creates a personal reference library that speeds up future projects, turning a one-time purchase into a recurring productivity booster.
Ultimately, the goal of any creative tool is to remove friction between your vision and the final output. On Point Procreate Brushes achieve this by handling the tedious aspects of texture generation while leaving the creative direction entirely in your hands. Whether you are a freelancer rushing to meet a deadline or an educator demonstrating texture techniques to students, this toolset provides the reliability and versatility needed to execute high-quality work consistently. By following the installation instructions carefully and respecting the system requirements, you ensure a smooth integration that elevates your digital artistry from simple coloring to textured, professional-grade illustration.